
10-Minute Checklist for Emergency Water Cleanup
The moment you see water spreading where it shouldn’t be, your heart sinks. Whether it’s a burst pipe, a malfunctioning washing machine, or a nasty roof leak, water can begin to weaken your home’s structure in a matter of hours. This is when you need a clear, actionable plan for emergency water cleanup. This 10-minute checklist is that plan. It will walk you through the most critical steps to protect your property, your belongings, and your family’s safety.
Think of this guide as your first responder on the page. We know this is a stressful time, and the last thing you need is confusing jargon. We’ll break down exactly “what to do if water gets in your house” in a simple, step-by-step way, because acting right now is your single most powerful tool to stop a manageable leak from turning into a catastrophic, mold-ridden nightmare.
Why Emergency Water Cleanup Matters
Okay, let’s talk about why we’re all in such a hurry. You know how a spilled glass of water seems to spread everywhere in seconds? Now, imagine that on a massive scale inside your walls and floors. Water is sneaky. It doesn’t just sit there; it gets to work immediately, soaking into everything it touches.
Within the first day, that moisture starts breaking down the very materials that make up your home. But the real danger comes in the shape of mold. It doesn’t waste any time, either. In as little as 48 hours, you could have a mold problem starting behind your baseboards or under that soaked carpet. This is what turns a simple cleanup into a major headache. It’s also the number one reason you want to start a proper emergency water damage cleanup right away.
And it’s not just about mold. Have you ever seen a wooden door that won’t close properly after getting damp? That’s the kind of wood damage from water we’re trying to prevent. In serious cases, like a basement flood, you might even be worried about water in foundations of house stability. This is exactly why acting fast does more than just dry a floor, it protects your home from the inside out and stops this single event from causing water damage to home value that lasts for years.
Safety First: Before You Start
Before you even think about grabbing a mop or moving that rug, let’s push the pause button for just 30 seconds. Your safety, and your family’s, is the absolute number one priority. Water and electricity are a dangerous mix, and you never know what might be hiding in that water.
So, your very first move is to shut off the power to the wet areas at your circuit breaker, but only if you can get to it safely without walking through water. If you can’t, it’s time to call an electrician. And before you step anywhere, suit up! A simple pair of waterproof boots and rubber gloves can protect you from slips and possible contaminants. Remember, a quick safety check now keeps you in control for the rest of this process.
Step 1: Assess Water Damage
Now that you’re safe and geared up, let’s play detective for a moment. Your mission is to figure out where the water is coming from and how bad it is. This is the first important step to assess water damage effectively.
Is it a gushing pipe under the sink? An overflowing toilet? Take a quick look around. Are there damp patches creeping up the walls? Is the carpet squishy across the whole room? This quick scan helps you understand the scale of the problem, because it’s the difference between a small, manageable job and a situation where you’ll want to call in the pros, which we’ll talk more about in a bit.
Step 2: Stop the Water Source
Great, you’ve sized up the situation. Now, let’s put a stop to it. Just like a doctor works to stop the bleeding before anything else, your next job is to stop the flow of water. If a burst pipe or a leaking appliance is the reason, find your home’s main water shut-off valve and turn it. This prevents thousands of dollars in additional water damage to house structures and belongings.
If the water is coming from outside, like from heavy rain, do what you can to divert it away from your home, and sandbags are great for this. And remember those appliances? Go ahead and unplug them. This isn’t just about stopping water; it’s about preventing any electrical hazards, which ties right back to our “safety first” chat. This step is the core of any true emergency water removal & cleanup effort because you can’t start fixing the problem while it’s still getting worse.
Step 3: Remove Standing Water
With the water source stopped, it’s time to roll up your sleeves. The goal now is to get the water out, and fast. The longer it sits, the deeper it soaks in. Use a wet-dry vacuum, mops, towels—whatever you have on hand that can move water from your floors to a drain. This is the “removal” part of your emergency water cleanup services job.
As you’re clearing the water, try and be smart about your furniture. Lift wooden chairs and table legs onto blocks of wood or even pieces of foil. This simple trick prevents more of that wood damage from water we talked about earlier by stopping the furniture from acting like a sponge.
Step 4: Dry and Ventilate
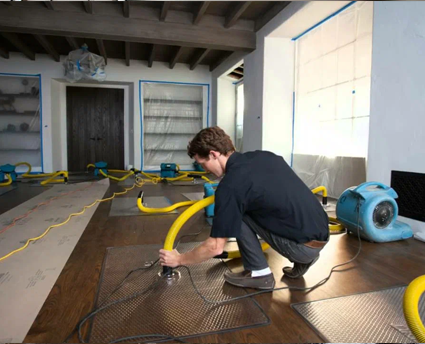
You’ve done a fantastic job getting rid of the visible water. But here’s the part most people overlook; the real danger often hides where you can’t see it. Think inside your walls, under the floorboards, and deep within your carpet padding. This is where proper drying comes in, and it’s the most critical step to prevent mold and truly complete the restoration of water damage.
Crank up those fans, open the windows if it’s dry outside, and if you have a dehumidifier, now’s the time to let it work overtime. You want to create a wind tunnel effect to evaporate all that hidden moisture. This is exactly what the pros do on a larger scale. While your fans are working on the surface, this intense drying handles the deeper saturation, saving your home’s structure for good.
Step 5: Save & Protect Your Belongings
Now that the bulk of the water is gone, it’s time you focus on your stuff. Your furniture, rugs, and even those important documents need some TLC, and fast. The goal is to get them dry and away from the damp area.
Start by moving wet items to a dry, well-ventilated space. For wooden furniture, wipe it down and let it air dry, but keep it out of direct sunlight to prevent cracking. Those precious photo albums and documents? If they’re soaked, you can place them in a freezer, as this stops further damage and gives you time to get them professionally restored later. By separating damp items, you’re basically limiting the problem and preventing mold from hopping from one item to another.
Step 6: Check for Mold & Secondary Damage
Remember how we said mold can start in as little as a day or two? Now’s the time to put on your detective hat again. Over the next few days, keep a close eye (and nose) out for signs of mold. Look for fuzzy patches or dark spots on walls and ceilings, and be alert for a musty, earthy smell.
Finding mold means it’s time to call in specialized help for the final water damage restoration. This isn’t just about cleaning a surface; it’s about making sure the wood and other materials don’t lead to long-term rot or air quality issues in your home.
Step 7: Document for Insurance
Before you start cleaning and even while you’re at it, there’s one more super important job. Pull out your phone and take loads of pictures and videos of the entire scene. Get wide shots of the room and close-ups of the damage, including soaked drywall, ruined furniture, that high-water mark on the baseboard.
This visual evidence is your best friend when dealing with your insurance company. It clearly shows the full extent of the water damage to home and supports your claim, making the process smoother and helping ensure you get the fair compensation needed for a proper restoration.
Step 8: Call an Emergency Water Cleanup Company
You’ve been a hero, managing the immediate crisis. But some jobs are just too big for DIY. If you have a large area affected, you can still smell moisture after a couple of days, or you’ve spotted mold, it’s the right time to call a 24 7 emergency water cleanup company.
These emergency water damage cleanup experts come with tools most of us don’t have, like industrial air movers and dehumidifiers, and moisture meters that can find hidden dampness inside your walls. They handle the heavy lifting, make sure everything is bone-dry, and can even help with the insurance process, giving you the confidence that your home is truly safe and sound again.

Final Thoughts
Facing water in your home is not something you would wish to experience, but by acting quickly and responsibly, you can take back control. From that first safety check and stopping the source, to careful drying and saving your belongings, every step you’ve read here is designed to save you from any long-term damage.
If the situation feels beyond a quick DIY fix, or you want the peace of mind that every hidden drop of moisture is found, remember that our team at Rock Bottom Recovery & Restoration is here to help. We provide professional Emergency Water Cleanup, available 24/7, to step in and ensure your property is thoroughly restored. For immediate assistance, call us at 331-256-1728 or visit Water Damage Cleanup to learn more about how we can help you get back to normal.
Frequently Asked Questions
Stop the source, shut off power, and remove water immediately. Use fans and dehumidifiers to dry everything quickly and prevent mold.
Weeks of standing water can cause damage. Fix leaks and improve drainage fast to avoid costly foundation cracks.
Call a certified water restoration company for large spills or hidden moisture. They have the right tools to dry your home completely.
Costs depend on the job size. Small leaks are a few hundred dollars; major flooding can cost thousands. Acting fast keeps costs down.
Often, yes—for sudden issues like burst pipes. It typically does not cover floodwater or damage from poor maintenance. Check your policy.